Andor’s Traditional Ribs!
Yes! This is it! The ribs I served for several years at gatherings of many varieties. This is a time consuming recipe, but it’s actually quite simple and pretty easy to accomplish. The seasoning is a pairing of sauce, dried herbs and spice blends that are available at most big box grocery stores. If You have eaten My ribs in the past, You were very likely devouring the following recipe..
With that said, this is slow cooking! It’s very simple, but since You are cooking at low temperatures, it takes a while. Barbecue is different from grilling in that You tend to use indirect heat. Many hours will pass by once the actual cooking commences and every 20 or 30 minutes, You’ll be adding wood to the coals, flipping racks and spreading thin layers of sauce! One must have the dedication to give 4 to 8 hours of loving to Your ribs for them to acheive that highly desirable, fall off the bone texture. As such, I have divided this up into two recipes that have the same seasoning arrangement. ‘The Way of the Food Junky’ delivers the afore stated texture, as well as that lovely smokey flavor. Taking 5 to 8 hours depending on the temperature in Your smoker/grill and the thickness of the meat being used. ‘The Slacker’s Attempt’ is done at higher temperature in the oven, which means it cooks through in 3 or 4 hours, but brings forth tougher meat. Both do taste quite good of course!!
Ingredients(listed per 1 rack of pork spare ribs with the cartilage tips not trimmed):
1.5 tbsp – Garlic Granules
3 tbsp – Chili Powder Blend(the kind for making chili!)
3 tbsp – Ms. Dash Lemon Pepper Blend(or 2 tbsp of regular lemon pepper)
2 tbsp – Dried Thyme Leaves
2 or 3 tbsp – Dried Terragon Leaves
2 tbsp – Freshly Ground Peppercorns(the multi colored peppercorn blends will add a lot more depth than just black pepper)
Salt to taste, although, I’ve rarely ever salted this recipe…
3/4 of a cup or so of BBQ Sauce, We all have our favorites, or hate the stuff. This recipe is based on the thick midwestern, tomato based sauces. I use Ken davis, which is from Minnesota and Sweet Baby Ray’s, which I beleive is from Illinois.
The Way of the Food Junky: The First Method
Supplies Needed:
Baking sheet with raised edges that is large enough to hold Your rack of ribs. A Very sharp knife for slicing. A brush, fork or spoon for spreading sauce. Smoker or large grill(You don’t want your ribs near the coals). with enough of a tasty hardwood(cherry and hickory are My main choices) or charcoal(1 to 1.5 standard bags), to keep a decent temperature for 6+ hours. If You are using charcoal, You shall also require chips/chunks of one of the afore stated woods, along with a large bowl or 1 gallon bucket, with water high enough to cover the wood chips.
Prep:
Get Your smoker or grill started. I tend to start large in My modest smoking pit. If using a regular grill however, You’ll be needing a very small pile of coals. The desired temperature is about 260F, starting a little hotter than that won’t hurt at all. I would avoid going over 300F for any period of time when Your cooking. While the fire burns out and becomes coals to cook with, You’ll be seasoning Your meat.
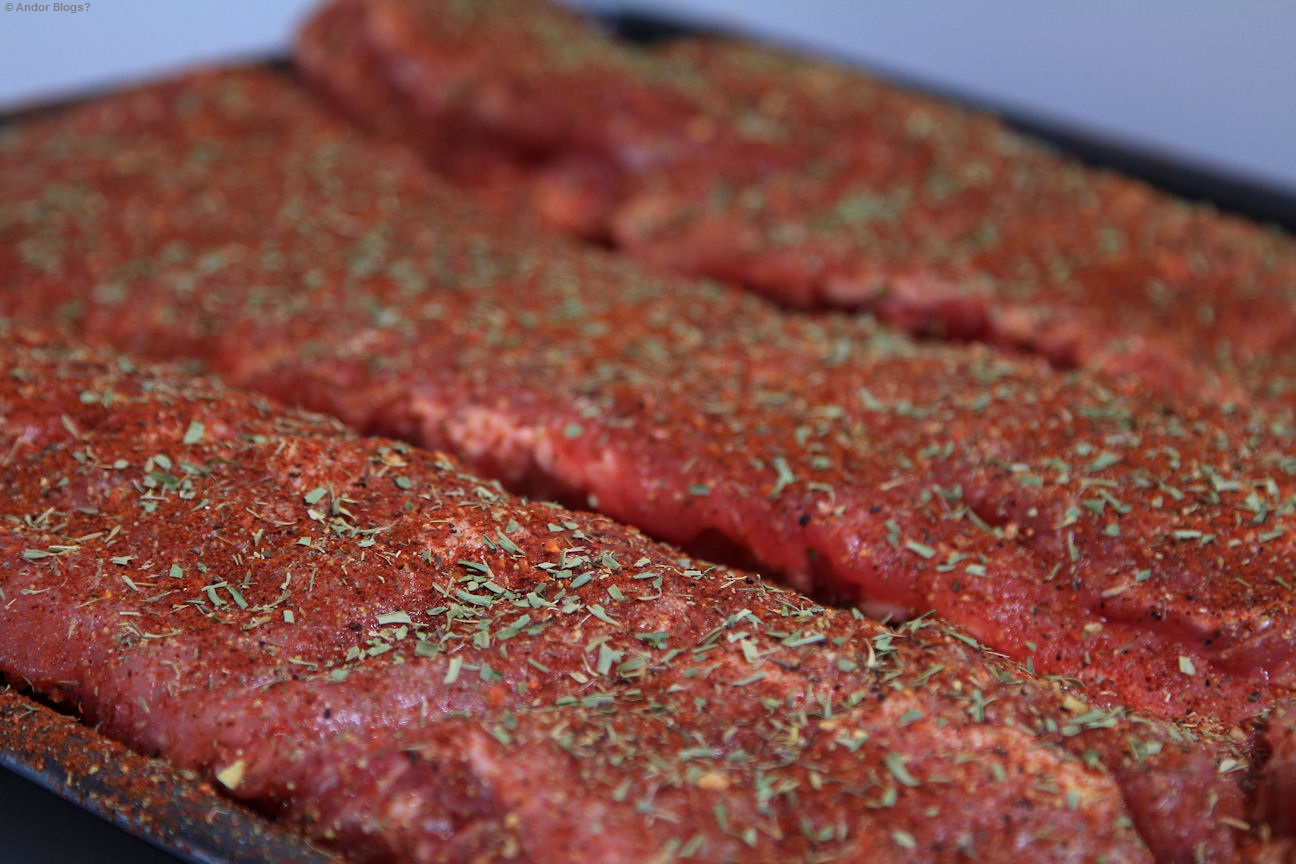
On Your baking sheet, lay the ribs in-side up(the bones should be curved like a shallow bowl). Evenly spread half of everything EXCEPT the sauce across the ribs, press or pat them in a bit, so the herbs don’t just fall off and flip the rack over. Spread the remaining herbs and spices over the top side of the ribs and press them in a bit as well.
Once You’ve got coals instead of flames, it’s time to get smokin’
Cooking:
If using a smoking pit, simply place Your ribs on the rack and close the lid. For charcoal users, You’ll need to soak the wood chips in water for an hour or so before use. Add wood/charcoal to the coals as needed to maintain the desired temperature of 260F or so. When adding to the coals, it’s best to spread them out a bit and put the fresh stuff centered on top. This will get the new stuff burning and formed into coals the fastest, as well as add a perch for the wet wood chips, thus protecting the coals. Some put the chips in foil, I just lay it on the top in a fist sized lump. Every 20-30 minutes, You’ll need to add another fist-full of wet wood chips to the top of the coals, so as to keep the smoke billowing out.
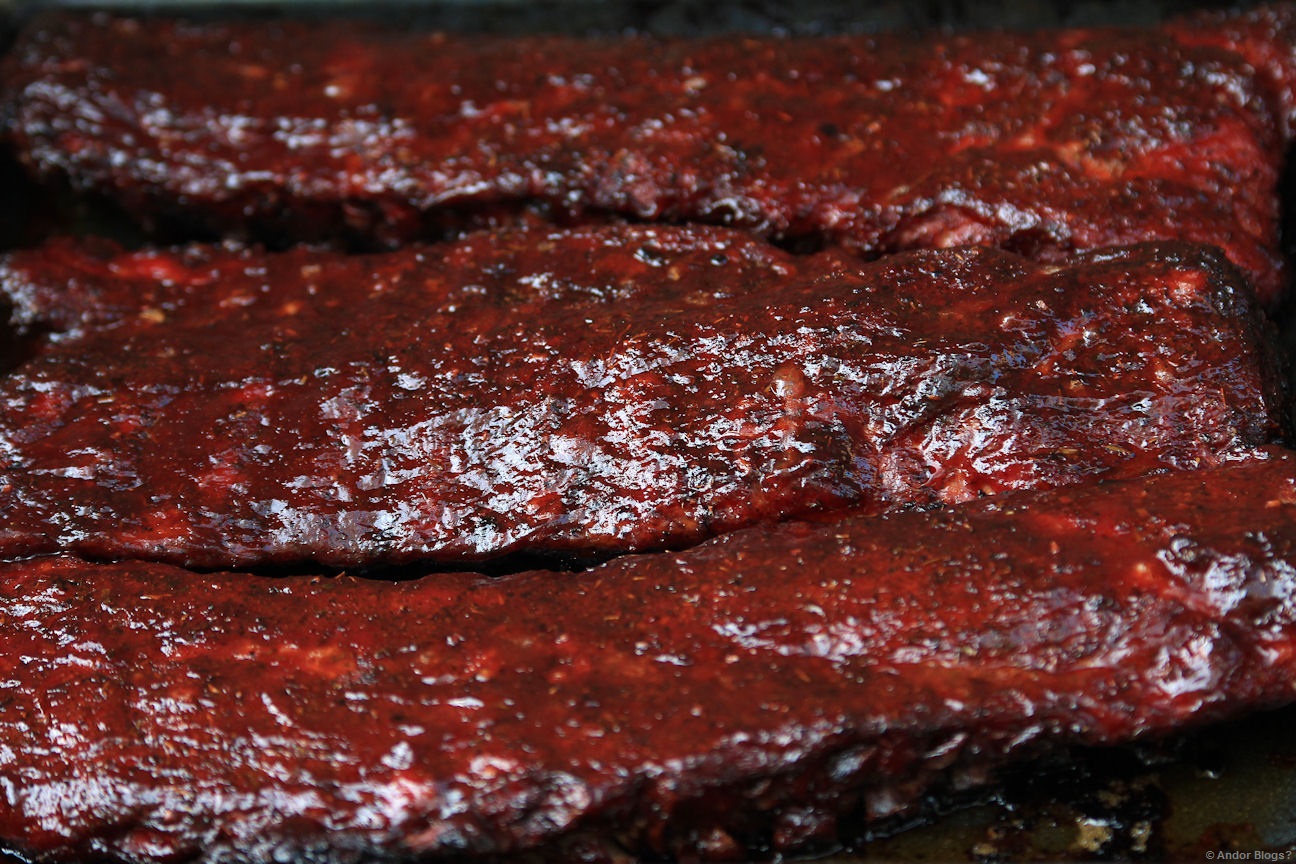
Continue this cycle: flipping the ribs before adding more charcoal and wood chips, every half hour or so until the meat seems fully cooked, but not yet tender. On a hot summer day, this can be done in about 4 hours, however, on a cool spring or fall morning, it will likely take 6 or more hours to get it cooked through. Then, You want to start brushing on the sauce in thin layers, while continuing the flipping and adding to the coals cycle, adding sauce every time You flip the ribs. Keep it up until You can wiggle the bones away from the meat. Remove from the grill and let the rack rest for 10 minutes before slicing and serving.
The Slacker’s Attempt: The Second, Shorter Method
Supplies Needed:
A baking sheet with raised edges and a sharp knife for slicing. An oven safe bowl with 1 or 2 cups of red wine or sherry and an equal amount of water. A brush, fork or spoon for spreading sauce.
Prep: Preheat Your oven to 400F. Season the ribs as described in the prep section above.
Cooking:
Put the bowl containing the watered down wine on to the bottom rack of the oven. Place the pan laden with ribs middle rack of the oven and immediately lower the tempurature from 400 to 300. Bake for an hour and start flipping them every 30-45 minutes for an additional 2.5 hours. The meat should be just about cooked to the bone at this point. If it doesn’t feel cooked, then let it bake a while longer. Sauce the bottom of the ribs first, then flip and sauce the top side. Place the ribs back in the oven for 20 minutes, or until the sauce has thickened. Remove from the oven and let it sit for 10 minutes before slicing and serving.
Notes:
All cooking times will vary depending on the tempurature, thickness of meat and bones, etc…
On a regular grill, such as a Weber, You’ll want to shove the coals off to one side and place the meat on the rack as far away from the heat as possible. If You can’t manage to cook without burning the edges, You may want to consider starting the ribs on the grill. Using very little charcoal, but a lot of wood in a short period of time, say 45 minutes to an hour. Then place the ribs in the oven at 260F to actually cook them. This will give You a nice smokey essense and reasonable control over the texture of the meat. This is also the best method for those who live in the north. Trying to smoke food in temperatures under 20F tends to give a more jerky-like texture. As well as force You to use 3 or 4 times the amount of charcoal.
I use to peel the membrane off of the under-side of the ribs, but in the last couple years, I have swayed away from this. Leaving it in place does reduce the thickness of the smoke line(the red’ish color in the outer sections) in the meat and thus decreases the smokey flavor slightly, but it makes it a little easier to control the texture by holding in more moisture. It’s a preference thing that I don’t think makes much of a difference.
Using the ‘Slacker’s Method’ You can also achieve that succulent, fall off the bone texture. Instead of cooking at 300, lower the temperature to 260 and add an hour or two to the cooking time.
This recipe is actually pretty tasty without the sauce, so long as You don’t burn the spices and herbs during cooking. This will make it a bit bitter. It’s better to use fresh herbs if You’re going this route though.
The Charcoal quantities listed are for use with My pit smoker which has a 15×18 inch burning chamber and a 15×30 inch cooking area. You’ll use less with a normal grill.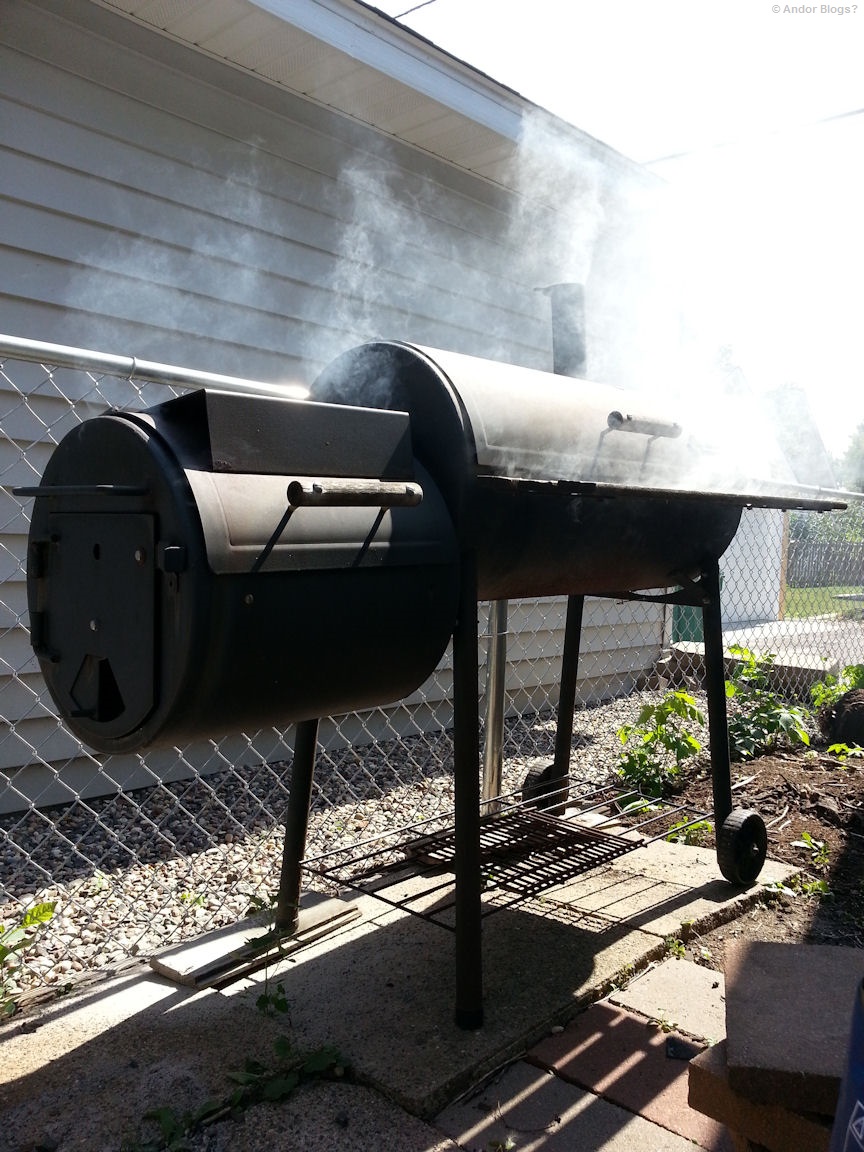
Fruit Stuffed Tenderloin
")
")
")
A sweet and savory meat dish. It’s a recipe I stumbled upon while sifting through a stack of old family cook books a couple years ago. No idea why I didn’t attempt to make it sooner. Far more delicious than I anticipated after reading the ingredient list. If you use the right amount of apple juice in the roasting pan, you end up with 2 sweet sauces to accompany your meal. I drizzled the apple/dripping sauce atop some spinach and cooked down the last of the basting sauce to use for dipping. Loins cooked in this fashion would go well with some wild rice and steamed, buttered asparagus, or brussel sprouts, or as pictured, with fresh greens. Serves 8 to 12 depending on the size of your tenderloin.
Supplies Needed: Sauce Pan, Roasting Pan or Baking Sheet with high sides, Mixing Bowl, Cook’s String, and a Large Sheet or cutting board for prep. If Your tenderloin did not come in a vacuum sealed, leak-proof packaging, You shall also need something large enough to soak the meat in.
Ingredients:
1 Pork Tenderloin
1 Large Onion, chopped
3/4 of a cup of Bread Crumbs
half a cup of Dried Cranberries
half a cup of Dried Apricots, chopped
half a cup of Golden Raisins
half a cup of Apricot Preserves
1 cup of Apple Juice, possibly more.
1.5 cups of Port Wine
2 tbsp of Thyme
1 tsp or so of Cinnamon
1 cup of water
2 tsp or so of sea salt
Salt and Pepper to taste
Prep and Cooking:
First, mix a cup of the port wine, a cup of water and 2 teaspoons or so of sea salt. Mix until the salt has dissolved. Put Your tenderloin into the mixture and store in the fridge for at least 6 hours, rotating the meat as needed to get it soaking in from all sides.
In a mixing bowl, combine the onions, bread crumbs, dried fruit and a quarter cup of the port. Next, You must butterfly the tenderloin. Lay it out length-wise on a sheet or cutting board and slice down the side, half way up like a hot dog bun. Do try to make the top and bottom even in thickness, or it will cook un-evenly. After it’s cut open, salt and pepper all sides to Your liking. Lay it with the inside facing up and rub/sprinkle on the thyme and cinnamon, then spread the dried fruit and bread crumb mixture evenly over the meat, fold the tenderloin back up and tie it shut. Pre-heat Your oven to 350 degrees. Place the loin in the roasting pan, pouring the apple juice into the bottom of the pan. Roast for 35 minutes.
In a small sauce pan, bring the preserves and remaining port(1/4c) to a boil, stir until it starts to thicken up a bit. I started this sauce 25 minutes into the roasting on medium-low heat and it was a nice semi-thickened sauce, perfect for basting when I checked the loin at 35 minutes. Use this sauce to spread upon the tenderloin. You will want 3 to 5 layers for a nice sweet glaze. Continue to roast, basting every 5-10 minutes until the tenderloin is cooked fully, a meat thermometer should read at 160 degrees(F) or more. Remove from the oven and let stand for 5-10 minutes, slice and serve!
Notes:
This recipe is very sweet. The dried fruit and the port have a fair amount of sweetness to them, then You add the apricot preserves into the mix as well. If You can aquire some ‘less sugar added’ preserves, I would do so.
If You’re buying a tenderloin that comes in vacuum sealed plastic, You can make the brine/marinade with half of the quantity listed above. Cut a slit at one end of the packaging, drain the extra liquids and pour in the salted wine marinade, tying the end shut again with string, or twist ties. This is the most effective method for spreading the flavor, as well as using the least amount of wine/water/salt. On the other hand, those buying from a butcher, hunter or farmer will likely have to use a large bowl or cooking pot/pan of some variety. Which will require much more of the marinade to be made. If You have a ‘food saver’ or vacuum sealer, this might be a nice time to get some use out of it..
