Apple Tree Blossoms
Yeah, I’ve gotten pretty far behind on posting here. Hopefully I’ll be caught up in a week or two. It’s mid-summer now, but here are a few shots of the first flowers that bloom in My yard every year. Too bad the squirrels haven’t let us have any of the apples in a decade or so…
")
")
")
")
30 Hour Vacation
I bought a Canon 6D and their 24mm f/1.4 L series lens to go with it. Anxious to make use of these new toys, I started asking around to see if any of My friends wanted to go camping. An old friend that I rarely talk to opted in, along with Her husband and three dogs. The morning of departure, I shot them a text to see if they were running on schedule. The reply was, “We have to cancel.” Her family rents out a few houses around the neighborhood, one of which was to get new tennants after the weekend. The person who had lived there decided to leave the place packed full of crap, clutter and furniture. It looked like a pack rat was living there. Hell bent on getting out of the city, I met up with them and we had the place mostly empty in under three hours. Happily, we then proceeded to get in the van and drive north. It was already after noon on saturday, but in My book, any time outside of city life is time well spent. It was a lovely drive, just south of Lake Superior’s western-most point, we encountered a thick fog. These pictures do not do it justice, one could barely see a hundred yards for a good twenty miles.
")
")
")
Just south of the lovely town of Duluth, the fog lifted and my friends, who had never been to this part of Minnesota, could see why I love this little city, perched on a hill. The place has an unusually elaborate system of bridges. Partially due to the fact that this is a busy port town, but that still does not explain why the highway has so many bridges, crossing, rising and bending in every which way. Duluth has so many great angles and lines built in to it’s infrastructure. Some time soon I think I shall head up there, just to photograph the genius of those who designed and built the city. Passing through, I snapped a couple of shots through the dirty windows on the car.
")
")
")
For those of us from the Twin Cities, Duluth is the gateway to the north shore. Once You have passed through town, You find Yourself on the red road. The red tarmac doesn’t last long, but is a much welcomed sign that You have left the urban environment behind. From that point, heading north-east along Lake Superior’s coast, is a long, long stretch of rolling hills, rocky shores, winding rivers and endless forest. My favorite place to be! We headed up the coastal road passing through the many State Parks and National Forests. Eventually finding ourselves at Cascade State Park, which is a little more than an hour from the Canadian border. It was already pretty late in the day, but we rapidly set up camp and got a fire going. After filling our bellies, we walked the couple hundred yards over to the lake and spent about two hours just sitting, taking in the vast darkness. It was a foggy night, visibility was quite low, but the sound of the waves rolling onto the rocky shore was just what I needed.
")
")
")
Once back at our campsite, we all went to bed pretty quickly. In the morning, we took a walk up the Cascade River, pausing for Me to take the following pictures and proceeded to head south, Hoping to make a couple of stops along the way back home.
")
")
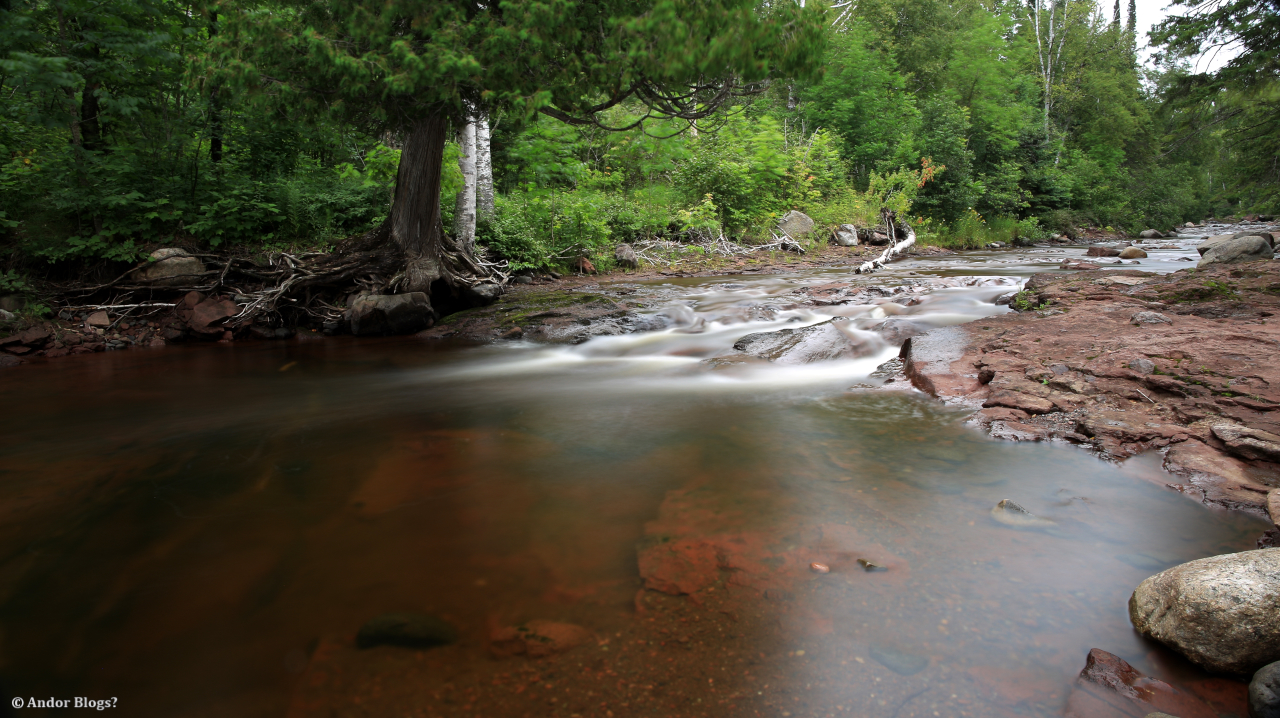
My friend has a bad back, which chose to throw Him into a state of agony on this trip. I felt bad that He was in so much pain, so we took it easy on the return trip. In the end, we passed by all but one of the sights that the North Coast has to offer. I simply would not come up here without a stop at that which has become My favorite waterfall. Which I took a bunch more pictures of.. The overcast sky made taking pictures a lot nicer than the bright, sunny day the last time I was there. I took My time, stopping every couple hundred yards, pondering the angles I desired and taking more pictures, long exposures, all the way up the valley. The place was nice and quiet, we only saw two other groups of people the whole time we were there. What a wonderful place.
")
")
")
")
")
")
")
")
")
")
")
After basking in the cool water for a while, we climbed back into their van and headed towards home. Driving back down the coast, leaving behind the natural beauty of this post-glacial landscape and entering the land of human civilaization. The farther south You go, the impact of man kind becomes more and more evident. The lone road gets wider, sparcely placed houses give way to towns, tunnels bring You under towering rocky hills and eventually, You find Yourself looking at the ports and populated hills of Duluth. We paused there to stretch our legs and take a final look at the vast expanse of water, before climbing back into the van and continuing south towards Saint Paul. We managed to ride the leading edge of a storm for a couple hundred miles, all the way home. Arriving back in city life, just in time to see a very bold and beautifully colored sun set. Sorry, I did not get a picture of that, there were buildings in the way…
")
")
")
")
")
")
")
")
")
")
")
")
")
")
")
")
")
")
")
")
")
")
")
")
")
")
")
")
")
")
")
")
")
")
")
")
")
")
")
")
")
")
")
")
")
")
On and Around Nicollet Island
I Headed upstream to hang out with a good friend. We spent most of the day walking around Nicollet Island and down to the dam at Saint Anthony Falls. It made Me realise just how long it has been since I walked miles and miles with no set destination. This was such a large part of My teenage years, suddenly it feels like a lost part of who I am has been rediscovered. Unlike in the past when I was up to various mischievous activities, now I carry a camera. Let’s see where this goes.
")
")
")
")
")
")
")
")
")
")
")
")
")
")
")
")
")
")
")
")
")
")
")
")
")
")
")
Gnarly Spider
We found this gorgeous spider after a hike in the northern woods of Wisconsin this weekend. I think it is some variety of Orb Weaver, but I am not certain. The green on the spider’s back matches the fungus found on many trees and rocks in the region. Body length was nearly an inch. It was one awesome looking little creature.
")
")
")
")
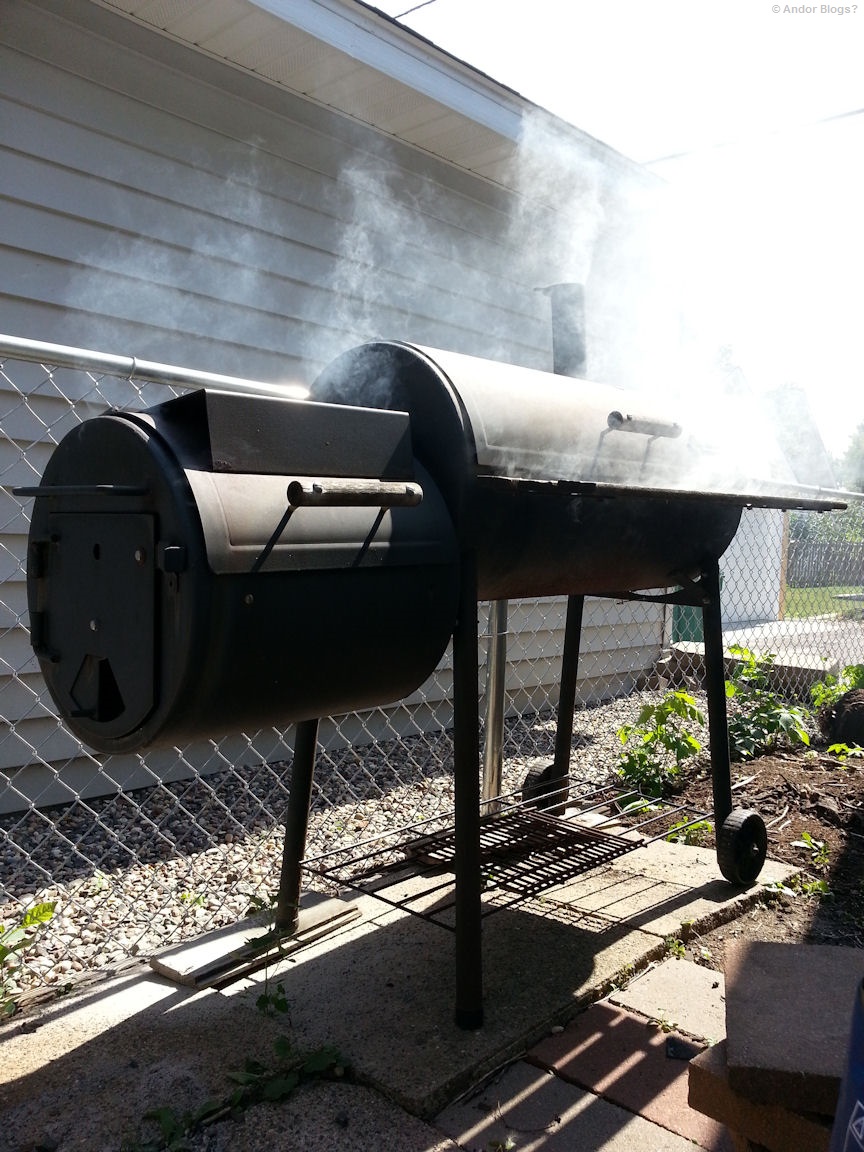
Andor’s Traditional Ribs!
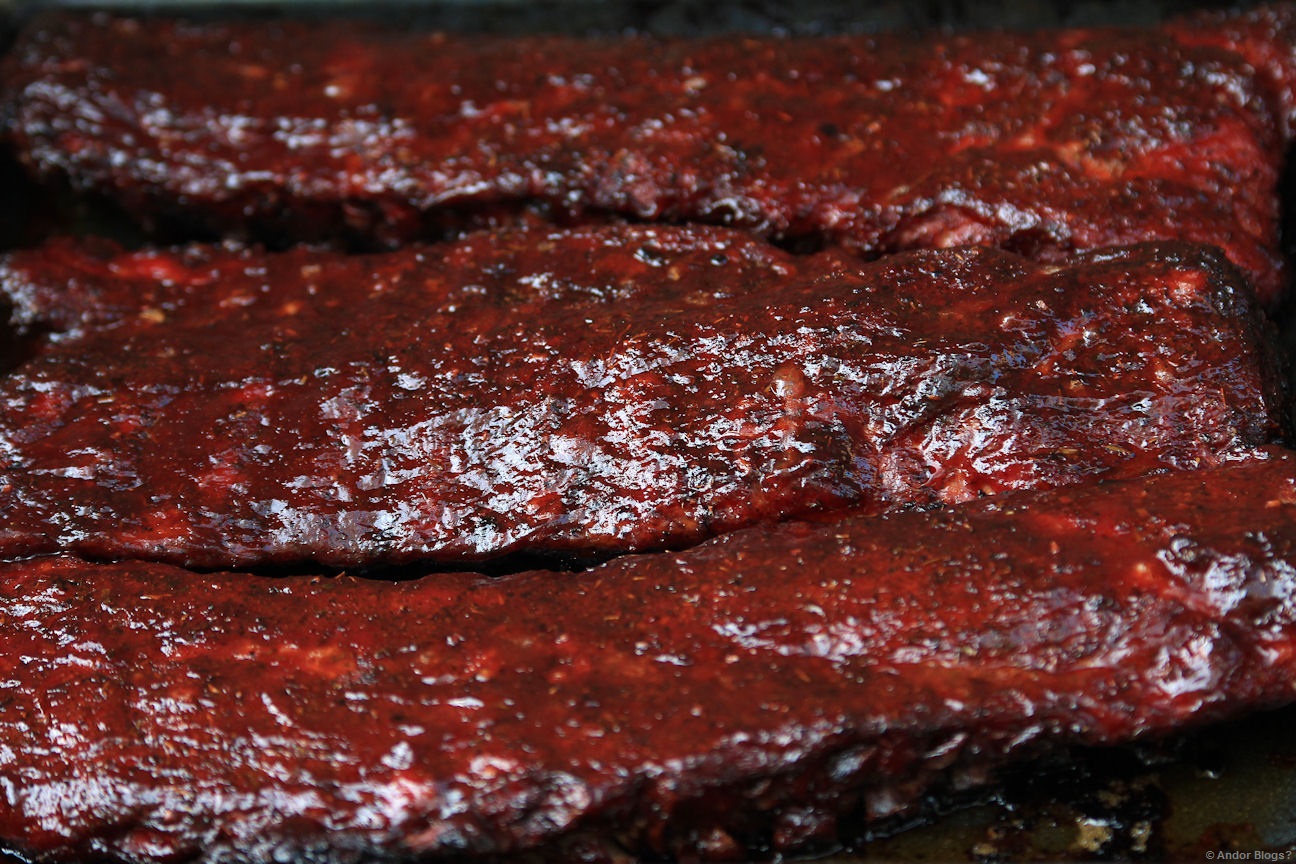
Yes! This is it! The ribs I served for several years at gatherings of many varieties. This is a time consuming recipe, but it’s actually quite simple and pretty easy to accomplish. The seasoning is a pairing of sauce, dried herbs and spice blends that are available at most big box grocery stores. If You have eaten My ribs in the past, You were very likely devouring the following recipe..
With that said, this is slow cooking! It’s very simple, but since You are cooking at low temperatures, it takes a while. Barbecue is different from grilling in that You tend to use indirect heat. Many hours will pass by once the actual cooking commences and every 20 or 30 minutes, You’ll be adding wood to the coals, flipping racks and spreading thin layers of sauce! One must have the dedication to give 4 to 8 hours of loving to Your ribs for them to acheive that highly desirable, fall off the bone texture. As such, I have divided this up into two recipes that have the same seasoning arrangement. ‘The Way of the Food Junky’ delivers the afore stated texture, as well as that lovely smokey flavor. Taking 5 to 8 hours depending on the temperature in Your smoker/grill and the thickness of the meat being used. ‘The Slacker’s Attempt’ is done at higher temperature in the oven, which means it cooks through in 3 or 4 hours, but brings forth tougher meat. Both do taste quite good of course!!
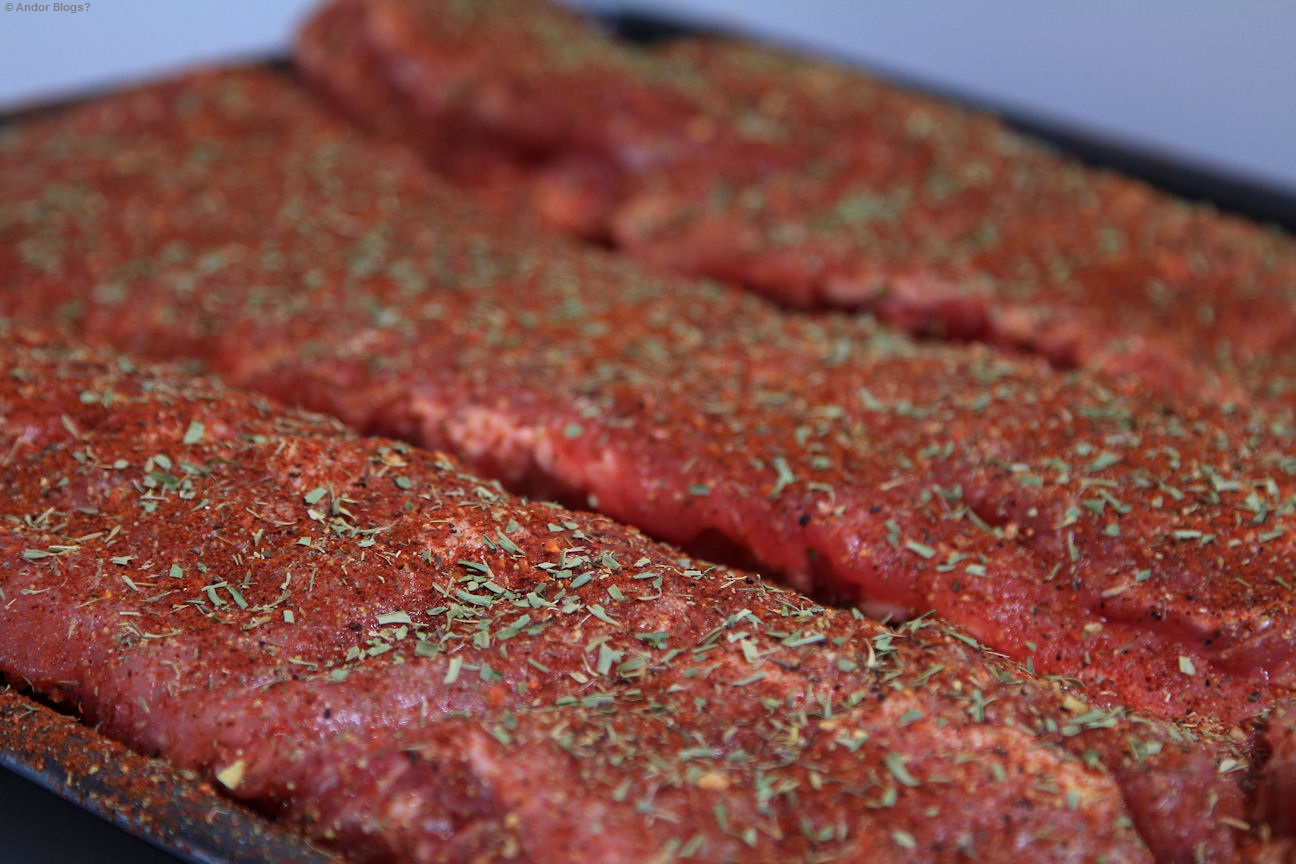
Ingredients(listed per 1 rack of pork spare ribs with the cartilage tips not trimmed):
1.5 tbsp – Garlic Granules
3 tbsp – Chili Powder Blend(the kind for making chili!)
3 tbsp – Ms. Dash Lemon Pepper Blend(or 2 tbsp of regular lemon pepper)
2 tbsp – Dried Thyme Leaves
2 or 3 tbsp – Dried Terragon Leaves
2 tbsp – Freshly Ground Peppercorns(the multi colored peppercorn blends will add a lot more depth than just black pepper)
Salt to taste, although, I’ve rarely ever salted this recipe…
3/4 of a cup or so of BBQ Sauce, We all have our favorites, or hate the stuff. This recipe is based on the thick midwestern, tomato based sauces. I use Ken davis, which is from Minnesota and Sweet Baby Ray’s, which I beleive is from Illinois.
The Way of the Food Junky: The First Method
Supplies Needed:
Baking sheet with raised edges that is large enough to hold Your rack of ribs. A Very sharp knife for slicing. A brush, fork or spoon for spreading sauce. Smoker or large grill(You don’t want your ribs near the coals). with enough of a tasty hardwood(cherry and hickory are My main choices) or charcoal(1 to 1.5 standard bags), to keep a decent temperature for 6+ hours. If You are using charcoal, You shall also require chips/chunks of one of the afore stated woods, along with a large bowl or 1 gallon bucket, with water high enough to cover the wood chips.
Prep:
Get Your smoker or grill started. I tend to start large in My modest smoking pit. If using a regular grill however, You’ll be needing a very small pile of coals. The desired temperature is about 260F, starting a little hotter than that won’t hurt at all. I would avoid going over 300F for any period of time when Your cooking. While the fire burns out and becomes coals to cook with, You’ll be seasoning Your meat.
On Your baking sheet, lay the ribs in-side up(the bones should be curved like a shallow bowl). Evenly spread half of everything EXCEPT the sauce across the ribs, press or pat them in a bit, so the herbs don’t just fall off and flip the rack over. Spread the remaining herbs and spices over the top side of the ribs and press them in a bit as well.
Once You’ve got coals instead of flames, it’s time to get smokin’
Cooking:
If using a smoking pit, simply place Your ribs on the rack and close the lid. For charcoal users, You’ll need to soak the wood chips in water for an hour or so before use. Add wood/charcoal to the coals as needed to maintain the desired temperature of 260F or so. When adding to the coals, it’s best to spread them out a bit and put the fresh stuff centered on top. This will get the new stuff burning and formed into coals the fastest, as well as add a perch for the wet wood chips, thus protecting the coals. Some put the chips in foil, I just lay it on the top in a fist sized lump. Every 20-30 minutes, You’ll need to add another fist-full of wet wood chips to the top of the coals, so as to keep the smoke billowing out.
Continue this cycle: flipping the ribs before adding more charcoal and wood chips, every half hour or so until the meat seems fully cooked, but not yet tender. On a hot summer day, this can be done in about 4 hours, however, on a cool spring or fall morning, it will likely take 6 or more hours to get it cooked through. Then, You want to start brushing on the sauce in thin layers, while continuing the flipping and adding to the coals cycle, adding sauce every time You flip the ribs. Keep it up until You can wiggle the bones away from the meat. Remove from the grill and let the rack rest for 10 minutes before slicing and serving.
The Slacker’s Attempt: The Second, Shorter Method
Supplies Needed:
A baking sheet with raised edges and a sharp knife for slicing. An oven safe bowl with 1 or 2 cups of red wine or sherry and an equal amount of water. A brush, fork or spoon for spreading sauce.
Prep: Preheat Your oven to 400F. Season the ribs as described in the prep section above.
Cooking:
Put the bowl containing the watered down wine on to the bottom rack of the oven. Place the pan laden with ribs middle rack of the oven and immediately lower the tempurature from 400 to 300. Bake for an hour and start flipping them every 30-45 minutes for an additional 2.5 hours. The meat should be just about cooked to the bone at this point. If it doesn’t feel cooked, then let it bake a while longer. Sauce the bottom of the ribs first, then flip and sauce the top side. Place the ribs back in the oven for 20 minutes, or until the sauce has thickened. Remove from the oven and let it sit for 10 minutes before slicing and serving.
Notes:
All cooking times will vary depending on the tempurature, thickness of meat and bones, etc…
On a regular grill, such as a Weber, You’ll want to shove the coals off to one side and place the meat on the rack as far away from the heat as possible. If You can’t manage to cook without burning the edges, You may want to consider starting the ribs on the grill. Using very little charcoal, but a lot of wood in a short period of time, say 45 minutes to an hour. Then place the ribs in the oven at 260F to actually cook them. This will give You a nice smokey essense and reasonable control over the texture of the meat. This is also the best method for those who live in the north. Trying to smoke food in temperatures under 20F tends to give a more jerky-like texture. As well as force You to use 3 or 4 times the amount of charcoal.
I use to peel the membrane off of the under-side of the ribs, but in the last couple years, I have swayed away from this. Leaving it in place does reduce the thickness of the smoke line(the red’ish color in the outer sections) in the meat and thus decreases the smokey flavor slightly, but it makes it a little easier to control the texture by holding in more moisture. It’s a preference thing that I don’t think makes much of a difference.
Using the ‘Slacker’s Method’ You can also achieve that succulent, fall off the bone texture. Instead of cooking at 300, lower the temperature to 260 and add an hour or two to the cooking time.
This recipe is actually pretty tasty without the sauce, so long as You don’t burn the spices and herbs during cooking. This will make it a bit bitter. It’s better to use fresh herbs if You’re going this route though.
The Charcoal quantities listed are for use with My pit smoker which has a 15×18 inch burning chamber and a 15×30 inch cooking area. You’ll use less with a normal grill.