Stir Fry: Harvest Special
I didn’t grow a ton of veggies in the garden this year. I did have a substantial carrot patch, a mix of Touchon and Purple Dragons. I also had a pair of Fairy Tale eggplants, some Pablano peppers and a good amount of Tatsoi bak choi. Needless to say, all of these things came to meet one another in My wok. With a few additions, a very nice meal was spawned. There is just nothing better than garden fresh food! Here is what I did for the first meal after harvest. Paired with rice, noodles, or bread, this recipe serves two ravenous teenagers, or four average appetites.

Supplies Needed: Knife and cutting board. Wok, or large, high sided fry pan. Large bowl, or zip-lock bag for marinating.
Ingredients:
1.5 pounds of pork tenderloin, thinly sliced
3-4 large carrots, chopped into pieces no more than a quarter inch thick
4 small eggplants, sliced about a quarter inch thick(Kamo eggplants are best for frying)
1 large onion, chopped to Your liking
2 pablano peppers, diced
1 head of bak choi, stems removed(about 30, 3-4 inch leaves)
a quarter cup of dry sherry
1 tbsp of lemon juice
2 tbsp of hoisin sauce
salt and pepper to taste
bacon grease(I love bacon grease!), or Your choice of cooking oil.
Prep and Cooking:
Mix the sherry, lemon juice, hoisin and pablano peppers in a large bowl, or zip-lock bag. Add the pork and let marinate for at least 30 minutes(over night is best). Over medium-high heat, stir fry the carrots until they reach Your desired texture and remove from pan. Then stir fry the eggplants with black pepper and a pinch of salt and set aside as well. Now start cooking the onions, when they start to turn translucent, turn the heat to high and add the pork and liquid mixture. Stir fry on high until the meat is done cooking, then reduce heat to medium and stir in the bak choi. Then, turn off the burner and mix everything together. Plate and serve!
Notes:
Obviously, nearly any meat will work with this recipe.
Pablano peppers are really mild, this is not a spicy dish…
If using mock duck, marinate for no more than 5 minutes. Add the liquid marinade to the onions and let it thicken a little, before adding the mock duck to the fry pan.
Running short on time? Skip the marinating part, simply put the liquids and peppers in the pan when You go to cook the meat. It will still taste great, but the meat won’t be quite as flavorful.
Most varieties of eggplant will cook VERY fast and fall apart, becoming mush. Which is why I suggest Kamo eggplants, which hold their texture very well compared to every other variety. If using another kind of eggplant, You must pay close attention to the texture, once You can dent it with Your finger, remove from the pan immediately. Some eggplants are very moist inside, laying them on a dry towel or napkin after slicing(before cooking) can dry them a bit and thus help keep them from disintegrating as You cook.
You can use the bak choi stems if You like. Chop them up like onions and fry until tender after You cook the eggplant.
Cooking each ingredient separately helps mix up the flavors that hit Your tongue. You can indeed cook the carrots and onions together, then add the eggplant and meat. Stir frying till everything is done, but You end up with a more uniform flavor, which is good, but lacks the depth of each ingredient. You also have more control over the texture of each thing when cooking them solo…
I admit to using too much bacon fat in making this one. You may have noticed by the glossy nature in the photo… It was delicious though!
Cooking in the Twilight Hours
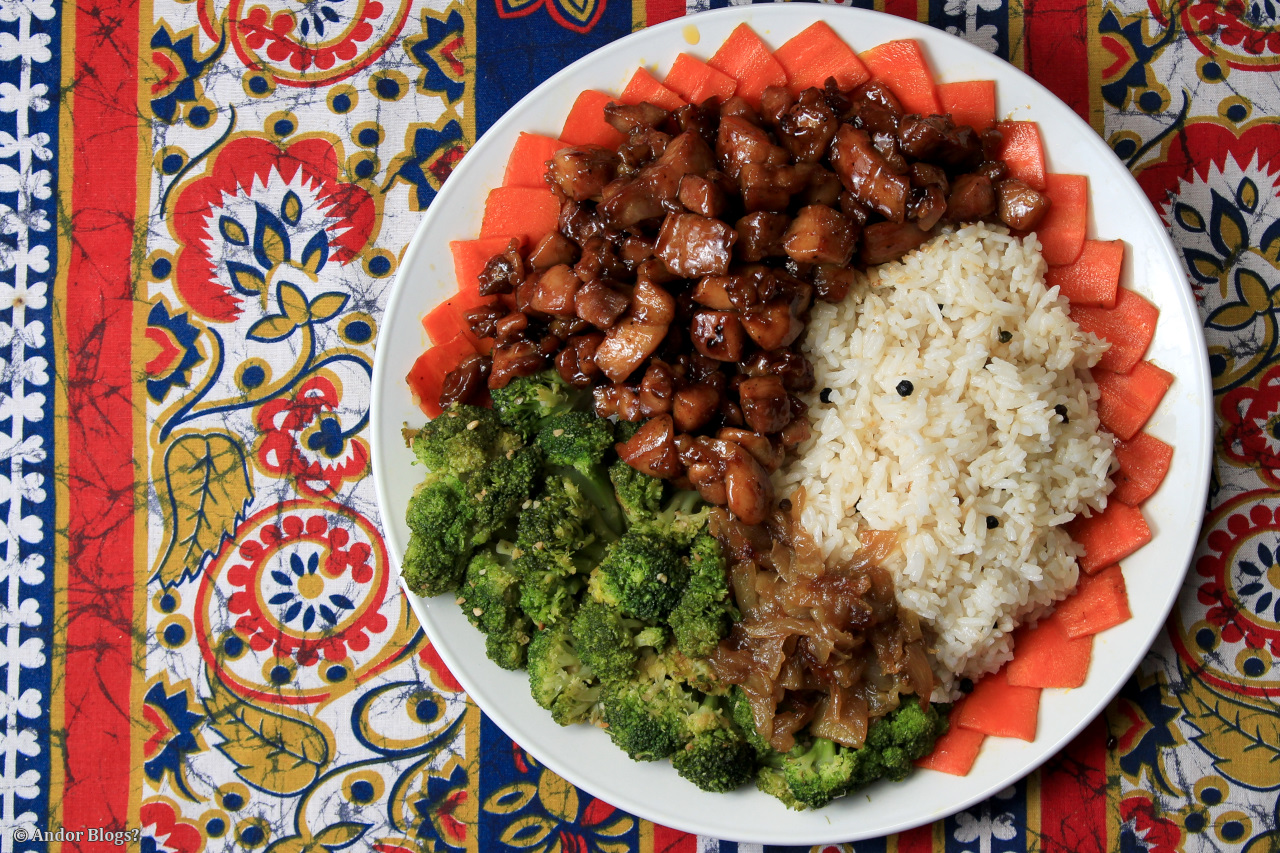
I often find Myself cooking between two and four in the morning. Not sure why, but this is when the proliferation of stir-fried creations tends to happen. In this case, a very simple set of ingredients lead to yet another delicious meal. Chicken in a salty caramel sauce, lightly fried veggies, caramelized onions and peppercorn rice. The chicken is a bit of a rip on a Vietnamese style Ga Kho, or as most of us call it, hot and spicy chicken. I simply omitted the fish sauce, lemongrass and ginger instead using seasoned salt. The rice was quite nice. It’s subtle, like sushi rice, until You bite on a peppercorn. If You use white pepper, it will be quite spicy. Other varieties emit a mild peppery flavor, but most of the bite dissipates while cooking. The onions took Me three hours to get to that amazingly sweet, gooey texture. If You skip that part however, this meal can be prepared and cooked in thirty to fourty-five minutes. Even faster if You make the chicken in one pan and the veggies in another.
For starters, chop up 2 medium to large onions and cook over low heat until caramalized and set aside. Don’t worry if it looks like a lot when You start, they will be dramatically reduced as You cook. This can take hours, but it is so worth it.
In Your rice cooker, or pot, add 1 cup of rice and 1 tbsp whole peppercorns, mix until the pepper is evenly dispersed. Then add 1.5 cups of water and 1 tsp of rice vinegar. Mix thoroughly and cook until the rice has reached Your desired texture.
While the rice is cooking, thinly slice a medium sized carrot and fry over medium heat to Your liking and remove from the pan. Then, stir fry 1 cup of brocolli with 1 cloves worth of minced garlic and a splash of soy sauce. Once finished, remove from the pan and wipe it clean.
Now, over high heat, stir fry 2 chopped up chicken thighs with 1 tsp rice vinegar, half a tbsp of lowry’s seasoned salt and 2 tbsp(or more!) of brown sugar. Cook until You have a thick brown caramel glaze and You are done. Enjoy!
Andor’s Traditional Ribs!
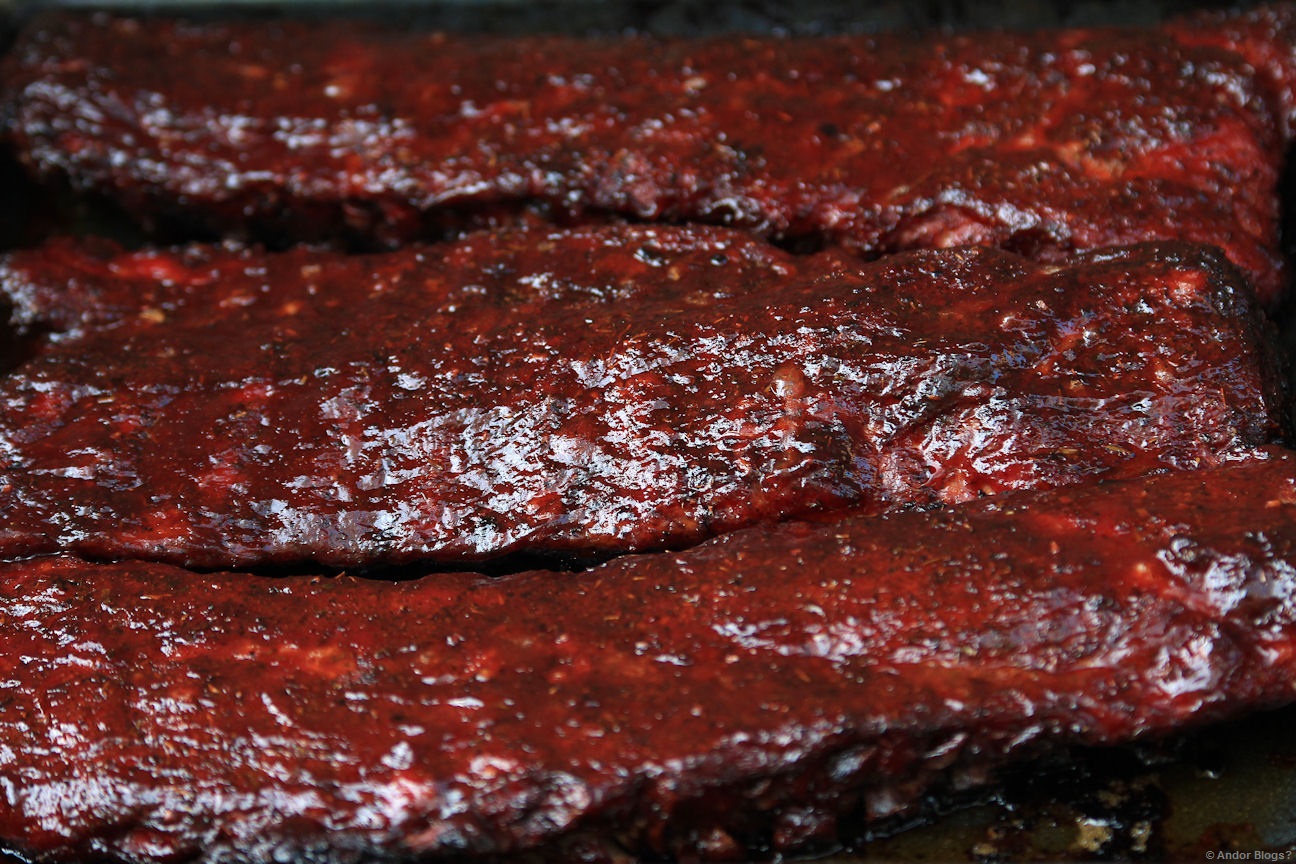
Yes! This is it! The ribs I served for several years at gatherings of many varieties. This is a time consuming recipe, but it’s actually quite simple and pretty easy to accomplish. The seasoning is a pairing of sauce, dried herbs and spice blends that are available at most big box grocery stores. If You have eaten My ribs in the past, You were very likely devouring the following recipe..
With that said, this is slow cooking! It’s very simple, but since You are cooking at low temperatures, it takes a while. Barbecue is different from grilling in that You tend to use indirect heat. Many hours will pass by once the actual cooking commences and every 20 or 30 minutes, You’ll be adding wood to the coals, flipping racks and spreading thin layers of sauce! One must have the dedication to give 4 to 8 hours of loving to Your ribs for them to acheive that highly desirable, fall off the bone texture. As such, I have divided this up into two recipes that have the same seasoning arrangement. ‘The Way of the Food Junky’ delivers the afore stated texture, as well as that lovely smokey flavor. Taking 5 to 8 hours depending on the temperature in Your smoker/grill and the thickness of the meat being used. ‘The Slacker’s Attempt’ is done at higher temperature in the oven, which means it cooks through in 3 or 4 hours, but brings forth tougher meat. Both do taste quite good of course!!
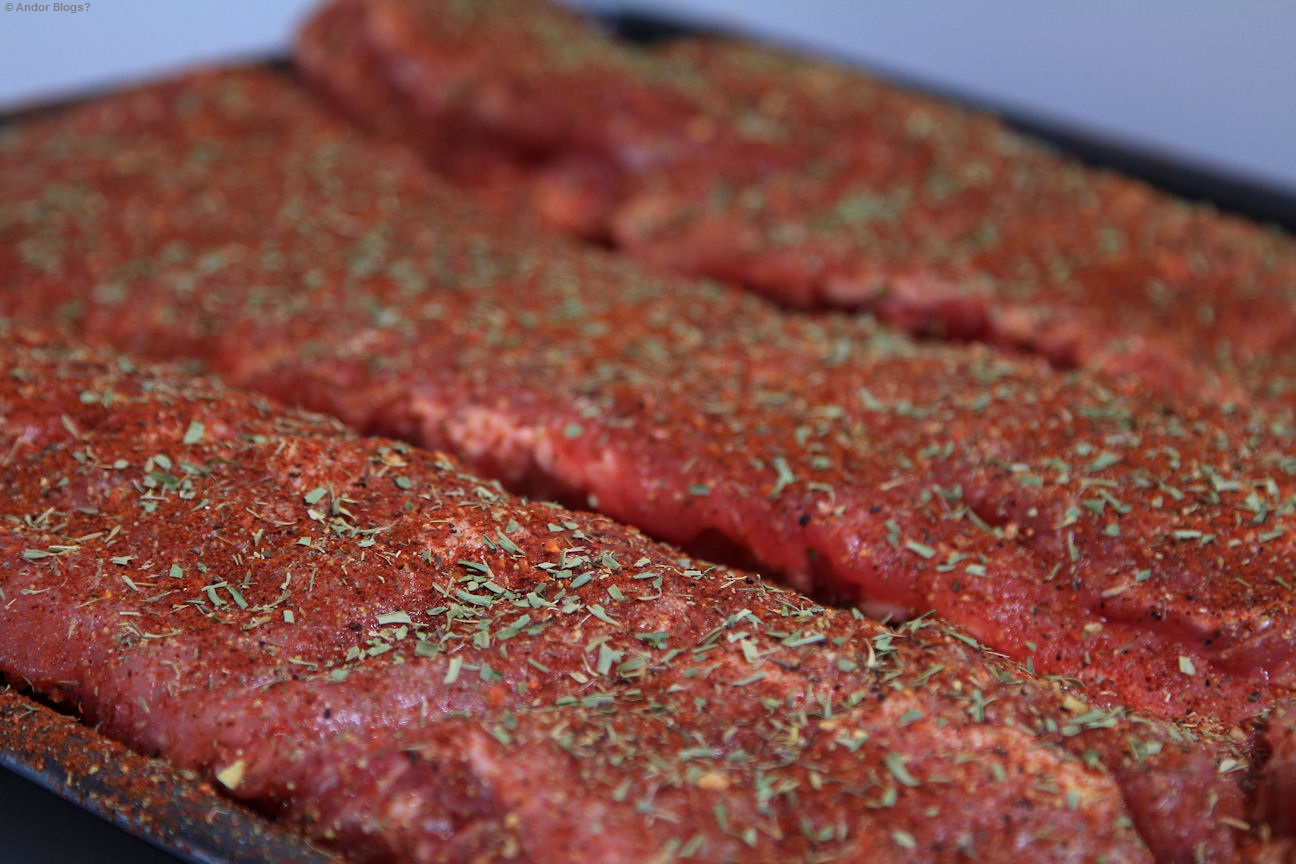
Ingredients(listed per 1 rack of pork spare ribs with the cartilage tips not trimmed):
1.5 tbsp – Garlic Granules
3 tbsp – Chili Powder Blend(the kind for making chili!)
3 tbsp – Ms. Dash Lemon Pepper Blend(or 2 tbsp of regular lemon pepper)
2 tbsp – Dried Thyme Leaves
2 or 3 tbsp – Dried Terragon Leaves
2 tbsp – Freshly Ground Peppercorns(the multi colored peppercorn blends will add a lot more depth than just black pepper)
Salt to taste, although, I’ve rarely ever salted this recipe…
3/4 of a cup or so of BBQ Sauce, We all have our favorites, or hate the stuff. This recipe is based on the thick midwestern, tomato based sauces. I use Ken davis, which is from Minnesota and Sweet Baby Ray’s, which I beleive is from Illinois.
The Way of the Food Junky: The First Method
Supplies Needed:
Baking sheet with raised edges that is large enough to hold Your rack of ribs. A Very sharp knife for slicing. A brush, fork or spoon for spreading sauce. Smoker or large grill(You don’t want your ribs near the coals). with enough of a tasty hardwood(cherry and hickory are My main choices) or charcoal(1 to 1.5 standard bags), to keep a decent temperature for 6+ hours. If You are using charcoal, You shall also require chips/chunks of one of the afore stated woods, along with a large bowl or 1 gallon bucket, with water high enough to cover the wood chips.
Prep:
Get Your smoker or grill started. I tend to start large in My modest smoking pit. If using a regular grill however, You’ll be needing a very small pile of coals. The desired temperature is about 260F, starting a little hotter than that won’t hurt at all. I would avoid going over 300F for any period of time when Your cooking. While the fire burns out and becomes coals to cook with, You’ll be seasoning Your meat.
On Your baking sheet, lay the ribs in-side up(the bones should be curved like a shallow bowl). Evenly spread half of everything EXCEPT the sauce across the ribs, press or pat them in a bit, so the herbs don’t just fall off and flip the rack over. Spread the remaining herbs and spices over the top side of the ribs and press them in a bit as well.
Once You’ve got coals instead of flames, it’s time to get smokin’
Cooking:
If using a smoking pit, simply place Your ribs on the rack and close the lid. For charcoal users, You’ll need to soak the wood chips in water for an hour or so before use. Add wood/charcoal to the coals as needed to maintain the desired temperature of 260F or so. When adding to the coals, it’s best to spread them out a bit and put the fresh stuff centered on top. This will get the new stuff burning and formed into coals the fastest, as well as add a perch for the wet wood chips, thus protecting the coals. Some put the chips in foil, I just lay it on the top in a fist sized lump. Every 20-30 minutes, You’ll need to add another fist-full of wet wood chips to the top of the coals, so as to keep the smoke billowing out.
Continue this cycle: flipping the ribs before adding more charcoal and wood chips, every half hour or so until the meat seems fully cooked, but not yet tender. On a hot summer day, this can be done in about 4 hours, however, on a cool spring or fall morning, it will likely take 6 or more hours to get it cooked through. Then, You want to start brushing on the sauce in thin layers, while continuing the flipping and adding to the coals cycle, adding sauce every time You flip the ribs. Keep it up until You can wiggle the bones away from the meat. Remove from the grill and let the rack rest for 10 minutes before slicing and serving.
The Slacker’s Attempt: The Second, Shorter Method
Supplies Needed:
A baking sheet with raised edges and a sharp knife for slicing. An oven safe bowl with 1 or 2 cups of red wine or sherry and an equal amount of water. A brush, fork or spoon for spreading sauce.
Prep: Preheat Your oven to 400F. Season the ribs as described in the prep section above.
Cooking:
Put the bowl containing the watered down wine on to the bottom rack of the oven. Place the pan laden with ribs middle rack of the oven and immediately lower the tempurature from 400 to 300. Bake for an hour and start flipping them every 30-45 minutes for an additional 2.5 hours. The meat should be just about cooked to the bone at this point. If it doesn’t feel cooked, then let it bake a while longer. Sauce the bottom of the ribs first, then flip and sauce the top side. Place the ribs back in the oven for 20 minutes, or until the sauce has thickened. Remove from the oven and let it sit for 10 minutes before slicing and serving.
Notes:
All cooking times will vary depending on the tempurature, thickness of meat and bones, etc…
On a regular grill, such as a Weber, You’ll want to shove the coals off to one side and place the meat on the rack as far away from the heat as possible. If You can’t manage to cook without burning the edges, You may want to consider starting the ribs on the grill. Using very little charcoal, but a lot of wood in a short period of time, say 45 minutes to an hour. Then place the ribs in the oven at 260F to actually cook them. This will give You a nice smokey essense and reasonable control over the texture of the meat. This is also the best method for those who live in the north. Trying to smoke food in temperatures under 20F tends to give a more jerky-like texture. As well as force You to use 3 or 4 times the amount of charcoal.
I use to peel the membrane off of the under-side of the ribs, but in the last couple years, I have swayed away from this. Leaving it in place does reduce the thickness of the smoke line(the red’ish color in the outer sections) in the meat and thus decreases the smokey flavor slightly, but it makes it a little easier to control the texture by holding in more moisture. It’s a preference thing that I don’t think makes much of a difference.
Using the ‘Slacker’s Method’ You can also achieve that succulent, fall off the bone texture. Instead of cooking at 300, lower the temperature to 260 and add an hour or two to the cooking time.
This recipe is actually pretty tasty without the sauce, so long as You don’t burn the spices and herbs during cooking. This will make it a bit bitter. It’s better to use fresh herbs if You’re going this route though.
The Charcoal quantities listed are for use with My pit smoker which has a 15×18 inch burning chamber and a 15×30 inch cooking area. You’ll use less with a normal grill.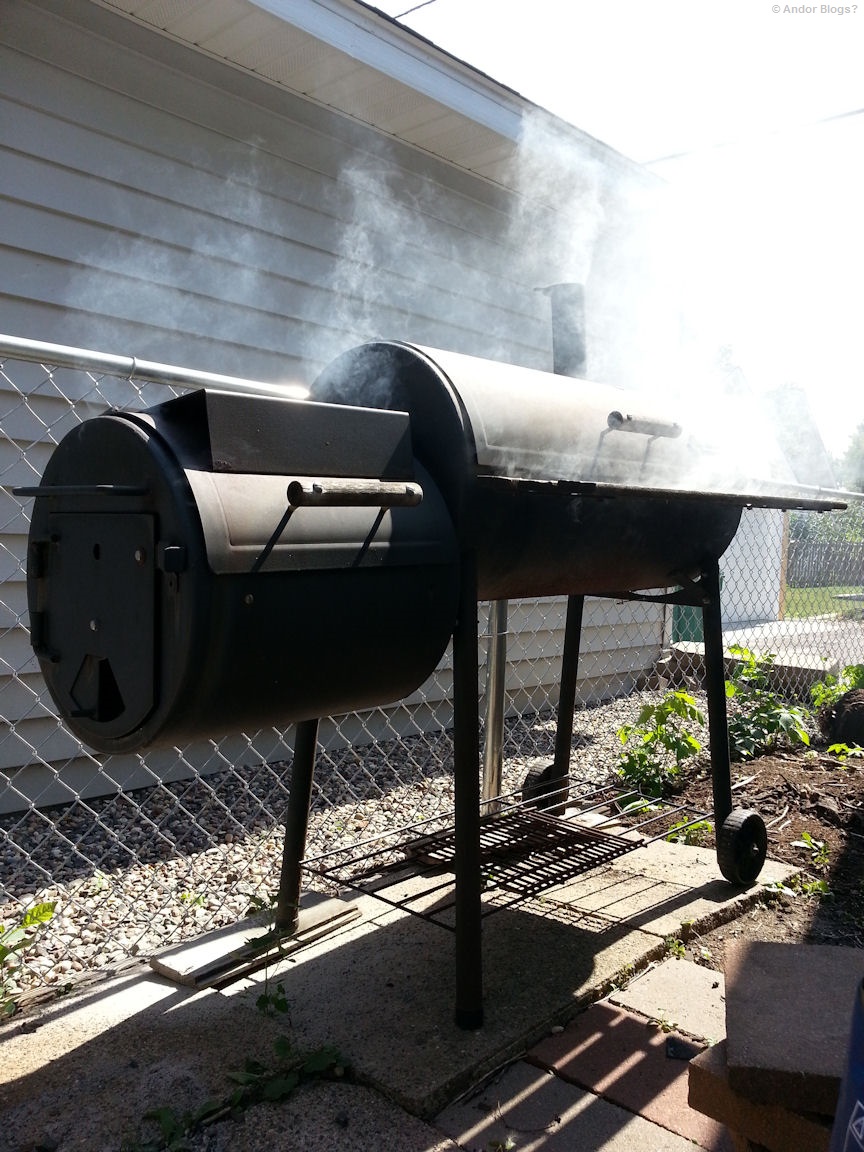
Spicy Garlic Chicken and Broccoli

My cooking style has always been to throw a bunch of things I like together, then hope it’s delicious… That’s how I made this one 5 or 6 years ago. I’m not sure how I lost this recipe, which was the most popular on My old site. I recently found it on an antiquated external hard drive that I haven’t been using, so here We go. One of the great many flavor combinations I’ve stumbled upon over the years. A good blend of savory, sour and sweet, followed by a round of heat! As with all Stir Fries, this is straight forward, fast and quite easy to make! Matched with a side of bread, noodles, or rice, this serves about 4 people.
Supplies Needed: A Wok or High Sided Fry Pan, Knife and Cutting Board. As well as a Large Bowl, Pot, or Pan to shuffle the cooked veggies onto while the meat cooks.
Ingredients:
2 or so lbs of Boneless Chicken, chopped
1 Bag of frozen Broccoli, thawed
6 to 8 large Garlic cloves, minced
1 Habanero Pepper, de-seeded and minced
1 large Onion, chopped
2 Carrots, finely chopped
3 tbsp of Rice Vinegar
2 or 3 tbsp Soy Sauce
1 and a half tbsp of Lemon Juice
3-4 tbsp of Hoisin Sauce
1 tbsp Mild Chili Powder
1 tsp of Terragon flakes
half a tsp of Turmeric
2 tbsp of freshly crushed Black Pepper
1 tbsp of Sugar(optional)
and 1 or 2 tbsp of veggie/canola/peanut oil.
Prep and Cooking:
Using med-high heat, put half the oil in the pan and start frying the Carrots, once they’ve started to cook a bit, add the Onions, Turmeric, half the Pepper and a third of the Garlic, stir fry til the Carrots and Onions are about half way done, add the thawed bag of Broccoli. Stir fry until all 3 ingredients are done, then remove from the pan. You don’t need to clean the pan either.
Set burner to high heat. Pour the rest of the oil into the pan, adding the Chicken, Habanero and remaining Garlic. Stir it up a bit and add the Sugar and liquid ingredients. Stir it again and add the remaining seasonings. Stir fry until the meat is cooked through, turn off the burner. Put the veggies back into the pan with the meat and mix everything thoroughly. Enjoy!
Notes:
If You’re using fresh Broccoli, simply steam it and mix into the pan at the end…
Some stove tops will have high enough heat to make the liquids sauce down, which is good. Others will have liquid in the bottom when the chicken is done cooking, that’s fine too! It still tastes great! Just use bread, noodles or rice to soak it up!
Obviously, this works just fine without the Habanero Pepper, for those who can’t handle the burn.
Fruit Stuffed Tenderloin
")
")
")
A sweet and savory meat dish. It’s a recipe I stumbled upon while sifting through a stack of old family cook books a couple years ago. No idea why I didn’t attempt to make it sooner. Far more delicious than I anticipated after reading the ingredient list. If you use the right amount of apple juice in the roasting pan, you end up with 2 sweet sauces to accompany your meal. I drizzled the apple/dripping sauce atop some spinach and cooked down the last of the basting sauce to use for dipping. Loins cooked in this fashion would go well with some wild rice and steamed, buttered asparagus, or brussel sprouts, or as pictured, with fresh greens. Serves 8 to 12 depending on the size of your tenderloin.
Supplies Needed: Sauce Pan, Roasting Pan or Baking Sheet with high sides, Mixing Bowl, Cook’s String, and a Large Sheet or cutting board for prep. If Your tenderloin did not come in a vacuum sealed, leak-proof packaging, You shall also need something large enough to soak the meat in.
Ingredients:
1 Pork Tenderloin
1 Large Onion, chopped
3/4 of a cup of Bread Crumbs
half a cup of Dried Cranberries
half a cup of Dried Apricots, chopped
half a cup of Golden Raisins
half a cup of Apricot Preserves
1 cup of Apple Juice, possibly more.
1.5 cups of Port Wine
2 tbsp of Thyme
1 tsp or so of Cinnamon
1 cup of water
2 tsp or so of sea salt
Salt and Pepper to taste
Prep and Cooking:
First, mix a cup of the port wine, a cup of water and 2 teaspoons or so of sea salt. Mix until the salt has dissolved. Put Your tenderloin into the mixture and store in the fridge for at least 6 hours, rotating the meat as needed to get it soaking in from all sides.
In a mixing bowl, combine the onions, bread crumbs, dried fruit and a quarter cup of the port. Next, You must butterfly the tenderloin. Lay it out length-wise on a sheet or cutting board and slice down the side, half way up like a hot dog bun. Do try to make the top and bottom even in thickness, or it will cook un-evenly. After it’s cut open, salt and pepper all sides to Your liking. Lay it with the inside facing up and rub/sprinkle on the thyme and cinnamon, then spread the dried fruit and bread crumb mixture evenly over the meat, fold the tenderloin back up and tie it shut. Pre-heat Your oven to 350 degrees. Place the loin in the roasting pan, pouring the apple juice into the bottom of the pan. Roast for 35 minutes.
In a small sauce pan, bring the preserves and remaining port(1/4c) to a boil, stir until it starts to thicken up a bit. I started this sauce 25 minutes into the roasting on medium-low heat and it was a nice semi-thickened sauce, perfect for basting when I checked the loin at 35 minutes. Use this sauce to spread upon the tenderloin. You will want 3 to 5 layers for a nice sweet glaze. Continue to roast, basting every 5-10 minutes until the tenderloin is cooked fully, a meat thermometer should read at 160 degrees(F) or more. Remove from the oven and let stand for 5-10 minutes, slice and serve!
Notes:
This recipe is very sweet. The dried fruit and the port have a fair amount of sweetness to them, then You add the apricot preserves into the mix as well. If You can aquire some ‘less sugar added’ preserves, I would do so.
If You’re buying a tenderloin that comes in vacuum sealed plastic, You can make the brine/marinade with half of the quantity listed above. Cut a slit at one end of the packaging, drain the extra liquids and pour in the salted wine marinade, tying the end shut again with string, or twist ties. This is the most effective method for spreading the flavor, as well as using the least amount of wine/water/salt. On the other hand, those buying from a butcher, hunter or farmer will likely have to use a large bowl or cooking pot/pan of some variety. Which will require much more of the marinade to be made. If You have a ‘food saver’ or vacuum sealer, this might be a nice time to get some use out of it..
Almond Chicken Curry

I’ve seen many recipes similar to this. It’s very close to more Thai styled peanut-based curries, found in many restaraunts here in America. Since I usually make that asian style curry with potatoes and spinach, the aging bak choy in My fridge turned out to be the perfect candidate to accompany this simple almond curry, which is seasoned with more of an Indian style. I ended up making a first attempt on a 4am cooking excursion. Frying up some bacon, to grease the pan and to have something to nibble on as I cooked, I rounded off the meal with a pack of strained ramen noodles. Don’t ask Me why I used two habanero peppers, it was some pretty fiery stuff, but it was quite delicious! I’ll be having future goes at this one for sure.. Prep and cooking took Me 45 minutes, including frying the bacon and greens separately, the curry it’s self should take an average home cook half an hour or so. When paired with veggies and rice, noodles, or bread, this recipe serves about 4 people.
")

")
Supplies Needed:
A Wok, or high sided Fry Pan, Blender, or something(magic bullet, mincer, large hammer?) to turn the nuts to sand sized particles or smaller, Knife and Cuttung Board.
Ingredients:
1.5 pounds of thinly sliced Chicken Thighs
1 Onion, chopped up as You like
30 Almonds, mashed, minced, or otherwise turned as close to a paste-like texture as possible
3 large Garlic Cloves, minced
Fresh Ginger, a piece about the diameter of a quarter, 2 to 3 inches long, minced
1-2 tbsp of Soy Sauce
1 tbsp Mild Chili Powder
1 tsp or so, Garam Masala spice blend
1 Bay Leaf
a pinch of Dried Terragon bits
half, to 1 cup of Water
a bit of Cooking Oil
To Cook:
Over medium heat, saute the bay leaf and garlic in a bit of cooking oil. Once the leaf starts to brown, add the ginger and chili powder. Stir for a few seconds and pour in the water. Adjust the burner to medium high, to high heat. Once this begins to boil, add the meat, onion, soy sauce, almond mash and half the masala blend, stirring frequently. When the meat is almost cooked through, add the remaining masala and the terragon. Cook until the liquids have become a nice thick sauce, discard the bay leaf, remove from heat and enjoy.
Notes:
If You cut the chicken into pieces more than a quarter inch thick, You will want to cook the meat half way before starting the above process. Slicing semi-frozen, boneless thighs makes it pretty easy to get nice thin slices.
If You do not have access to some Garam Masala, try adding 4 or so cloves and a 1-2 inch chunk of a cinnamon stick at the same time as the bay leaf. Removing them as the sauce starts to thicken.
If You so desred, You can soak the almonds in warm water for half an hour or more and peel the skin off of them. I just leave it on and toss the nuts into the food processor.. Also, if You are using chunks of almonds, You may want to soak them for a while before cooking, or at least put them in at the same time as the water, to soften them up a little.
A carrot or two adds a lot to this dish! Spinach, greens and broccoli match up quite nicely as well. Turmeric is also a great addition. Try a teaspoon of fresh lemon zest, or some minced lemongrass in place of the ginger. I find that a nice spicy chili, such as Thai Dragon, or Habanero, rounds this out very nicely. When adding such heat though, I admit to adding about a teaspoon of sugar, or 2 teaspoons of honey as well.
Marinated Pork with Peas

This is a particularly versatile flavor combination. Over the years, I have used it on cuts of pork from ribs, to tenderloin. I have also used it for marinating whole chickens prior to smoking them, as well as chicken stir fries and with veggie and shrimp dishes. It’s always a hit! The bitter punch of the time tested ginger/lemongrass match up, balanced by savory, salty and sweet elements, creates a lovely experience which is sure to satisfy the taste buds of all who consume it. Having done no research, I just assume this marinade was devised in China. It is pretty close to many common ‘bbq’ and ‘Sweet and Sour’ pork recipes found in south-east asia. I’m listing it as a stir-fry recipe, but the marinade is suited to nearly any cooking method one may choose. Eat this recipe with rice, or try serving it over a baked potato! Serves 4.
Supplies Needed: Large Ziplock bag or Bowl for marinating, Wok or Large Fry Pan, Knife and Cutting Board
Ingredients:
1.5 pounds of pork tenderloin, or de-boned chops, sliced into thin strips
1 large onion, chopped to Your liking
Half a bag or more of frozen sugar snap peas
3 tbsp of fresh ginger root, minced
2 tbsp of garlic, minced
6 inches or so of fresh lemongrass, at least half an inch thick, cut into 2 or 3 pieces
4 tbsp of cooking sherry
2-3 tbsp of soy sauce
1-2 tbsp ketchup
2 tbsp of sugar
1 tbsp mild chili pepper powder
Freshly ground pepper to taste
Prep and Cooking:
Mix all but the peas and onion together in a resealable bag, or large mixing bowl. Let it sit for at least 20 minutes, allowing it to marinate over night will deliver the best flavor. Heat Your pan on high and put ALL the ingredients in. Stir fry until the meat and onion are cooked and the liquids thicken up into a sauce. Remove from heat, discard the lemongrass chunks and serve.
Notes:
Don’t worry if You can’t get high enough heat to thicken the sauce in the time it takes for the other ingredients to cook. Just soak it up with some rice or bread, or remove everything else from the pan and cook the sauce til it’s thickened then mix everything back together.
Hot chili sauce is a great replacement for ketchup in this recipe too.
Bacon, Spinach and Shrimp

I’ve been told, several times, that this is the best thing I have ever cooked.. . A couple of weeks ago, I had some friends over for some bbq chicken and fried rice. One of which hit Me up the next day, thanking Me for serving some “yummy stuff,” which inspired Her to want to make “some bomb @$# food, like that bacon, shrimp, spinach thing You use to do.” So here We are, one of an endless stream of recipes that I had completely forgotten. Having made something like it twice in the time since this conversation, I find Myself wondering how such a recipe could have fallen out of the regular rotation. Why am I not eating this all the time!?
This is in fact, pretty much the same flavor arrangement as ‘Manated Pork with Peas,’ which can be found by scrolling down through this blog. Less the pork and onion, adding bacon, spinach and shrimp! I told You it’s versatile! Although, many ingredient changes, also require a change in cooking method.. I must also point out, that I never measure when seasoning things. To Me, cooking something slightly different, every time You cook it, is a huge part of the joy and fun in that which We call food. Thus, all quantities listed in My recipes are guesstimations, but should provide a solid starting point.. Please do leave some commentary should You give this one a try.
Supplies Needed: A wok or large fry pan, cutting board and knife/you can get by with just a mincer, also a small sauce pan, like You would boil a single pack of ramen in…
Ingredients:
1 pound of shrimps, steamed or boiled lightly
one third of a pound of bacon, sliced or chopped however You like
a bag of spinach, at least enough to make salad for 4 people
Half a bag of frozen sugar snap peas, thawed
4 tbsp of fresh ginger root, minced
2 tbsp of garlic, minced
6 inches or so of fresh lemongrass, at least half an inch thick, cut into 2 or 3 pieces
1/4 cup of cooking sherry
1-2 tbsp of soy sauce
2-3 tbsp of ketcup(optional, but it adds a lot)
1 or so tbsp of sugar, just enough to take the edge off the sour/bitter ingrdients
1 tsp mild chili pepper powder
Freshly ground pepper to taste
Prep and Cooking:
Over low to medium heat, mix all but the peas, bacon, spinach and shrimp in the small sauce pot, stirring as often as possible, until it has thickened into a nice sauce. Remove from heat, toss the chunks of lemongrass and keep stirring until You are ready to add it to the rest of the ingredients. At the same time You begin cooking the sauce, fry the bacon on medium heat in a wok or sizable skillet, remove from the pan once cooked to Your liking. Then, toss the sugar snap peas and a fist-full of spinach into the bacon grease, stirring constantly, adding the spinach one fist-full at a time. Keep it up until You’ve used about three quarters of the spinach and remove from the pan. This should only take 30 seconds to a minute. Turn the burner to high heat and toss the shrimps into the remaining bacon grease, fry for 20 to 30 seconds, depending on size. Remove from the pan and turn off the burner, add the bacon and cooked veggies back into the pan, mixing vigorously. Now You can also add the sauce and remaining spinach, or plate the food and distribute them between each serving. Time to eat!
Notes:
The key to this dish is to privide spinach, in three textures, fully cooked, partially cooked and raw. Hence the process of adding it a bit at a time. Hoisin sauce was not part of the origianl recipe, srirachi works quite well as a replacement. I almost always make this with a nice spicy kick!
You can also mince the lemongrass, but it MUST be broken down very finely. You can also buy lemongrass in frozen, pre-minced form as well as puree’d in a tube. I would use 2 or so tablespons of such options instead of a fresh stalk.
To cook this all in one pan, start by frying the bacon and shrimp, as described above. Remove them and start making the sauce. Once it’s almost thickened up, add the peas and commense the spinach application process. Mix everything back into the pan and You are done.. You’ll have to have thawed the peas for this method, or the sauce will be runny, which is fine by Me. This is the lazy method, the flavors become more of a blur, but it’s still damn good.
July 9, 2013 ***UPDATE ***
Last night I made a variation of this recipe with bak choi instead of peas and spinach. It was delicious. I made the sauce in one pan and stir fried everything else in another, while the sauce thickened. The bak choi stems were a really nice texture and the light flavor helped temper the powerful chunky sauce. I simply fried them in the bacon grease and added the green, leafy parts and some green onions once the stems were just starting to soften. A truely great dinner.
")
")
")
")
")
")
")
")
Andor’s Version of Pad Thai

I use to cook this a ton, but it’s been a while. Since Ryan moved to California I’ve had no requests for it! It’s not a traditional Pad Thai since I don’t use Tamarind and such. My cooking methods may or may not vary from traditional versions. Any Meat works, I tend to use Chicken, or Shrimp when I can afford it. I tried to list alternate items that I use as well. Serves 4 to 6.
Supplies Needed:
A wok or high sided frying pan, a cereal bowl for mixing and a large bowl to soak the noodles. Knife and cutting board.
Ingredients:
1 package or 1.5 to 2.5 lbs – of Meat finely chopped to 1/4th of an inch thick or less
1 – 14 or 16oz package of Rice Noodles
1 cup – Sprouts OR a large Onion(chopped to sprout size)
1/3rd lb. – Bacon(sliced into 1/3rd to 1/2 inch pieces)
3 – Eggs
1/4 cup – crushed Peanuts
1/4 cup – Fish Sauce
1/4 cup – Sugar
2 tblsp – Rice Vinegar
1 tblsp – Soy Sauce
Half a Lemon
4 – large cloves of Garlic, diced
1 tblsp – Chili Pepper Powder for flavor not heat(chili powder blends work ok too)
1 tblsp – crushed Cayenne or Spicy Pepper
Black Pepper to taste.
Prep and Cooking:
First, soak the noodles in warm water. I use HOT water from the kitchen sink. It should take 20-30 minutes of soaking to get the noodles to the right texture. You don’t want them fully cooked, just a bit under done, since they’ll get finished in the frying pan. If You’ve never prepared Rice Noodles before, I’d suggest You ask someone who has about the right texture, or You can be like Me and simply use trial and error! It’s EXTREMELY EASY to overdo these noodles. Then they get soggy and turn to a ricey paste…
While that’s soaking, Mix the Fish Sauce, Rice Vinegar and Sugar in a bowl. If You are NOT using fresh lemon/lime, add 2 tblsp of the bottled juice to the mixture and don’t add more when it’s mentioned later in the recipe. Let the mixture sit for now, You’ll have to stir it again before You use it…
Next, fry the Bacon over medium heat til it’s almost done. If You hate bacon grease, drain the extra out of the pan at this time, I tend to leave it. Turn the burner to medium high or high heat. Add Meat, Soy Sauce, 1 spoonful of the Fish Sauce mixture and 1/4th of the Garlic. If using regular Onions, add them once the Meat is half cooked. Cook til the Meat is done and remove it all from the pan. Throw the rest of the Garlic and the Under Cooked Rice Noodles in the pan with the Fish Sauce Mixture and everything else but the Eggs. Stir fry until the liquid is soaked into the noodles. Reduce heat to medium or medium high. Push off to one side of the pan, scramble the Eggs, add Sprouts, put Meat and Bacon back in, squeeze in the Lemon for all the juice it’ll give You. Mix it all up and You’re done!
Hope You Enjoy!
Notes: If You opt not to use bacon, You should use 2-3 tblsp of cooking oil instead. — If the noodles don’t get fully cooked and there’s no liquid left in the bottom of the pan, add water while it’s still frying. One spoonful at a time or You may turn it into mush! – Medium heat is for those who move slow or don’t keep the things in the pan moving. High heat is only for those who can keep whatever is in the pan in nearly constant motion! The heat will affect the taste a bit, since the Sugar will caramelize differently.
Things I’ve also used in this dish: Shredded or finely chopped Carrots, Sugar Snap Peas, Snow Peas, and Green Onions. Obviously You should experiment with Your own favorite things! Please let Me know if something You try works wonderfully!!
Beef Fajitas
A staple in Mexican-American cooking! This Fajita makes for one tasty meal. Despite first appearances, it’s very easy to prepare as well! Traditionally served with Sour Cream and Avocados. Can be made in as little as 45 minutes. Serves 4-6 people.
Supplies Needed:
A Frying Pan or Skillet, Large Mixing Bowl, Knife and Cutting Board.
Ingredients:
1 and a half pounds of Beef Skirt Steak(or another tender Steak) – cut into strips
1 Bell Pepper – de-seeded and sliced into strips
3 Garlic Cloves – minced
the juice of half a Lime
1 tsp of Chipotle or Mild Chili Pepper Powder
1/2 tsp of Paprika
1/2 tsp of Ground Cumin
2 tblsp of Extra Virgin Olive Oil
Salt and Pepper to Your own taste
12 Flour Tortillas
and possibly a little Cooking Oil
Pico de Gallo Salsa Ingredients:
6-8 ripe Tomatoes – diced
3 Scallions – diced
4-6 Radishes – diced
1 or 2 Serrano or Jalapeno Peppers – de-seeded and minced
3 or 4 tblsp of fresh Cilantro – diced
adding Cumin, Salt, and Pepper to Your liking
Prep and Cooking:
Combine the Beef, Garlic, Lime Juice, Chili/Chilipotle Powder, Paprika, Cumin, and Olive Oil in a Mixing Bowl. Salt and Pepper to Taste. MIX WELL. Let it marinate for at least 30 minutes. As with most meat marinades, covered in the fridge overnight is best.
To make the Pico de Gallo Salsa, put the diced Tomatoes in a bowl with the Scallions, Serrano/Jalapeno, Radishes, and Cilantro. Using Salt, Pepper, and Cumin to Your liking. Set the Salsa aside for now.
Heat the Tortillas in a LIGHTLY Oiled non-stick fry pan, one or 2 at a time. Covering with foil as You go to keep them warm and pliable.
Stir fry the Bell Pepper strips til done, then set aside.
Stir fry the Beef and marinade with a bit of cooking oil until the meat is browned and cooked through.
At this time You can add everything together on plates to serve, OR just put it all out on a table so everyone can ‘build their own’ fajitas…
NOTES:
If using Avocados, they are to be pitted, sliced and then tossed in Lime Juice(good use for the other half of the Lime not called for in this recipe, use 1-2 Avocados).
Onions also work well! I’d do them with the Bell Peppers..
Some people just put Tortillas in the micro-wave… One at a time, or they’ll stick to each other. High heat for 10-30 seconds, depending on Your microwave… This method may also make them a little tough around the edges if You over do it.
Cajun Spiced Chicken Stir-Fry

Many people tend to think stir-frying is just an asian thing. This, however, is simply not true. This particular recipe is My most recent stir-fry developement! A very basic flavor combination that goes well with most vegetables, pictured here with carrots, onions and broccoli, served on toasted whole grain bread. Albeit untried, I do beleive this would go well with pork or beef, amongst other things. Paired with rice, bread, or noodles, this recipe serves 2 ravenous teenagers, or 4 people.
Supplies Needed: A Wok or large, high sided Fry Pan, Knife and Cutting Board, Large Bowl, or Sealing Bag for marinating.
Ingredients:
1.5 lbs. Boneless, Skinless Chicken Thighs, sliced a quarter inch thick or thinner
2 Large Carrots, chopped into thin pieces
1 Onion, Chopped up too..
Half of a Bag of Frozen Chopped Broccoli, thawed
4 Tbsp – Cooking Sherry
2 Tbsp – Worcestershire Sauce
2 or 3 Tbsp – Cajun Spice Blend
1 Tbsp – Minced Garlic(2 large cloves)
2 or 3 Tbsp – Pure Honey
Salt and Pepper to taste
Bacon Grease or Cookig Oil as needed
Prep and Cooking:
Mix the sherry, worcestershire, half the cajun spice and half a tablespoon or so of salt into a large zip-lock bag and drop the chopped up Chicken into it. Mix that up and let it marinate for 20+ minutes. Now is a good time to chop Your vegetables! Heat Your wok at medium-high heat, grease the pan and start stir-fying the chopped carrots with half the garlic, after the carrots start to soften a little, add the onion and broccoli, continue frying until the ingredients are cooked to Your liking. Remove them from the pan and set aside. Add the chicken and all the contents of the marinade to the fry pan, also adding the rest of the garlic and any additional salt and pepper You want. Turn Your burner to high heat and stir-fry until the chicken is cooked through and the liquids start thickening, then add the last tablespoon of the cajun spice, pour the veggies back into the pan, drizzle the honey over the top, turn off Your burner and mix it all together. Plate and serve!
Note: The amount of sherry listed is for the lower end stuff found in most big box grocery stores here in North America. If using a quality sherry from a winery or liquor store, try using half the amount stated.
Honey Garlic Chicken

A very simple classic! Highly adaptable to suit almost any pallet. Takes about an hour and a half for prep and cooking. Often garnished with Chives or Parsley and served with a Spinach Salad or Mashed Potatoes and Green Peas. Serves 2-3.
Cooking Supplies Needed: Roasting Pan, or a large baking sheet with sides at least half an inch tall. Mincer Or Knife and Cutting Board.
Ingredients:
12 or so Chicken drumsticks or 6-8 thighs, 6 large cloves of Garlic – minced, 8 tblsp Honey, half a tblsp of Rosemary(5-10 needles/leaves) – minced, Salt to taste.
Prep and Cooking:
Mix the Rosemary and Garlic and let it sit for 15 minutes. Then, Salt the Chicken to Your liking and rub the Garlic and Rosemary mixture all over it. Let it sit for another 15-30 minutes(in the fridge if it’s really hot).
Lay the Chicken out in a Roasting Pan big enough to allow all the Chicken to lay flat. Also making sure the Garlic is spread out on top. Roast at 400 degrees in the oven for about 20 minutes. Once that’s done, pull the pan out and drain any excess liquids, NOT the Garlic tho! Pour the Honey over the Chicken, coating as evenly as possible. Roast for another 20 minutes, OR until the Chicken is a nice crisp glossy brown. Plate and serve.
Notes:
You may require more Honey, don’t feel bad, just do it! Works very well with the following: pepper, chives, parsley, lemon pepper, chili powder, cajun spice, fresh ginger, or freshly shaved lemon/lime/orange peel, aka zest..
